shopping cart $0.00

You have no items in your shopping cart.

register

Monthly Archives: February 2016

  • New Waffle Flower Stamp Set

    We have had our eye on this company for awhile and were thrilled to see them at CHA this year. They have some fresh ideas and some adorable clear stamp sets and dies.  Here is the Flower Leafy stamp set that we used for our store displays.  We thought it had a good collection of images to create some fun projects.

    waffleflower-leafy-stamp-se

    waffle-flower-peerless-watercolor-stripe (558x640)
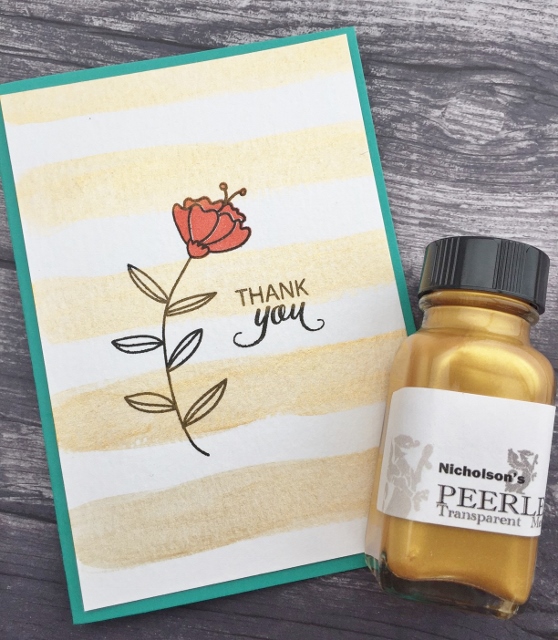
I love stripes and love the look of hand painted stripes as well.  I used the Peerless Transparent Watercolor to brush wide stripes onto the watercolor paper.  I did that first and let the watercolor dry, about 15 minutes, it dries really quickly.  Next, I stamped the images using Versafine black ink.  I stamped the top portion of the solid flower image using Fresh Ink tomato red. Tip: I like to use a broad brush for making stripes!  I think the Ranger Artist Brush Set has great brushes for the price.
    waffle-flower-watercolor (480x640)

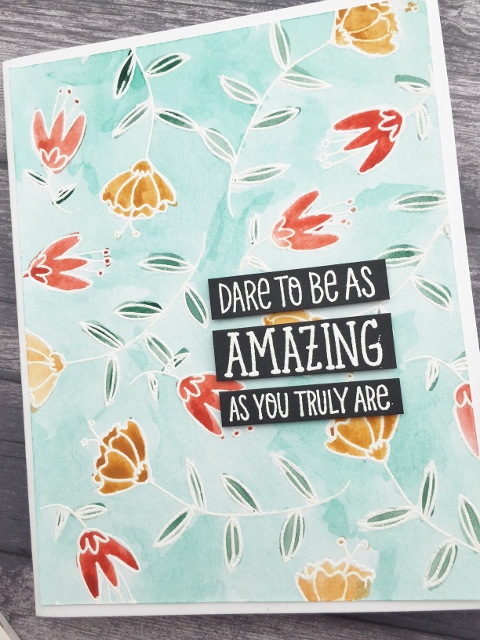
    I always like to do this easy white embossing watercolor look on cards.  You first will stamp images on watercolor paper using Versamark ink pad and stamp a pattern.  I've been using the Hero white embossing powder lately and it seems to work really well.  The end result seems to always be smooth and glossy.  Not grainy like others.  I'm not sure if there is any rule of thumb, but I will watercolor the background first.  I let that dry and then I will go back and watercolor the smaller items, like the flowers and leaves.  There are many different watercolor paints and sets out there.  For some reason, I keep going back to my Koi set.  I must like those colors.  For the greeting, I embossed with white on black paper.  Another TIP: look at your word stamps and think of different ways to use them.  I like to do this trick because you can change the format of the word stamp so that it will work on your card layout better.  For example, single line word stamps could be changed to two lines.

    waffle-flower-wide-pink-stripe (480x640)

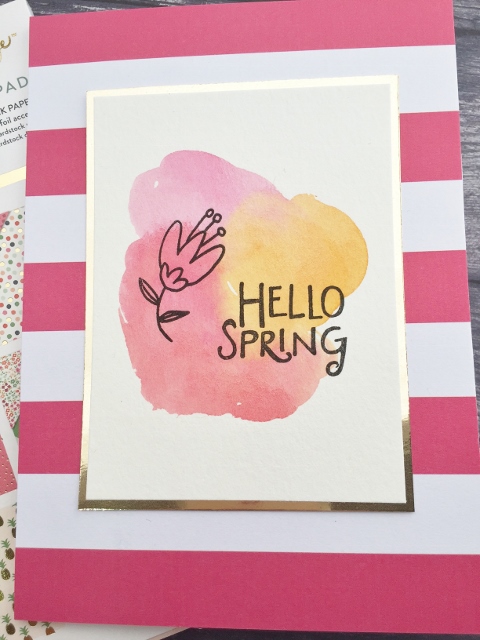
    Creating watercolor washes for backgrounds is an easy and super fast way to create a card with dimension.  I've always loved using some type of background when stamping your featured stamps on a card.  This watercolor trend is our new background stamp!  The fun thing is that you can create any pattern you want and each background is unique.  I've never met a stripe that I didn't like!  This paper is from the My Mind's Eye "On Trends 2" 6x6 paper pack.  I'll have a few more samples later in the week using this paper pack!  Hope you enjoy this new Waffle Flower stamp set as much as we do.  Stop by the store to see many more of their sets and dies!

  • AVERY ELLE CLASS ON SUNDAY!

    heather-avery-elle-class-1

    The Avery Elle release is here!  Perfect timing to take a class with one of Avery Elle's designers, Heather Campbell this Sunday!  (that's tomorrow!)  She will be using all of the hot new products from the release and teach you all of the tricks of the trade on making these detailed cards!  Call our Tukwila store to reserve your spot at 206.901.9101.  Sunday, Feb. 28 from 11:15 - 1:15 ($32.00) All you need to bring are markers or colored pencils, detail scissors and your favorite adhesive!  You won't want to miss this one!

  • New Glitter Paste by Bo Bunny

    We just received brand new colors of glitter paste by Bo Bunny!  We love to use the paste with some of our favorite stencils.  We used Caribbean glitter paste for the butterfly samples.  However, they have several new colors!
    IMG_2787I love this color of paste - it's so tropical and bright!  The stencil below is by Echo Park.

    IMG_2788

    It's easy to apply.  You simply use a spackle type tool to apply the paste.  You scoop out the glitter paste from the jar and then rub it over the stencil.  Using the flat part of the tool to help fill the paste into the design and also using the edge of the tool so that the paste is smooth.

    IMG_2789

    Here is a sample of the glitter paste covering all of the butterflies to create a background.

    IMG_2790

    I love this stencil because you can also use the paste to glitter individual butterflies as well.  The paste also dries fairly quickly,  For being a paste, it takes about 10 - 15 minutes and it's dry on your paper and you can start creating your card.

  • AVERY ELLE'S RELEASE: Thursday, February 25th

    New Avery Elle will be in the stores and online this Thursday!  The product is in our backroom and we can put it out tomorrow.  Come check it out then!  They were kind to send us some beautiful samples with their order.  We also have Heather Campbell back on Sunday teaching at our Tukwila store.  In the class you'll make projects using the new stamps and dies.  Call 206.901.9101 to reserve your spot!

    avery-elle-1 avery-elle-2 avery-elle-3 avery-elle-4 avery-elle-5

    There are so many great new clear sets!  We love all of the detail that goes into creating these cards.  These pictures don't do justice compared to seeing them in person!  Hope to see you this weekend.

  • NEW Pinkfresh Studio!

    We really like this company's style.  We were thrilled when we saw their fun new spring line at CHA last month.  Here are a few samples using the Felicity clear stamp set.  I love the sentiments in this set along with the other designs.  The typewriter font is perfect.

    pinkfresh-studio-flower-two

    prinkfresh-studio-flower-(1)
    prinkfresh-studio-flower-(2)

    Hope you enjoy their style as much as we do!  Here are some of the products that we have on the site. How cute are their watercolor word stickers?  They sold in our store so quickly that I didn't even get a chance to grab a pack for us to use to make samples!  Hope you enjoy this line as much as we do!

    pinkfresh-felicity-stickerspink-fresh-felicity

    pink-fresh-doodle-backgroun

  • Creating your own frame!

    make-custom-drawn-frame

    I know this is a Valentine sample but I still wanted to write about it because what I really love about this card is the frame!  Don't get me wrong, the puzzle heart stamp is adorable but the frame is what really caught my eye when I first saw this sample in the store.  Lisa Lee, owner of Inchie Arts made this card for a demonstration she did a few weeks ago.  She stamped the heart stamp on her white square twinchies piece and drew the frame around the stamped image using a black Micron pen.  The great thing about this pen is that it's waterproof.  Lisa teaches several times a year at our store and she is very knowledgeable about art products and techniques.  I learn something new every time I see her!  Hint, hint - we are hoping that she will teach a class using the Micron pen!  Call our store if you would like to be put on an "interest" list for a upcoming class.  Tukwila store: 206.901.9101

    Thanks for stopping by!

  • Guest Blogger: Amy Tsuruta - Part 4

    We really have had fun with Amy being our very first official guest blogger!  This is our final week that we will have her featured but I'm sure you will see her again here for other events!  Of course, you need to follow her on her blog as well!  She did a few more impressive cards and again, it amazes me when I have things that I've used a million times and think we've done every possible card with this item.  To only find, something new!  This is exactly how I felt when I saw our Seattle craft die used in the jar.  What a great idea!

    Hello-from-Seattle-skyline-by-Amy-Tsuruta-for-Impress

    You'll have to go to her blog to see how she did the blue sky!  I love this card with the black and kraft combo!  The heart rhinestone is the perfect added touch.

    For the next card, this is again, another way to use the jar die.  If you've noticed, Amy has used this heart border on a few cards.  It's great to re-purpose your stamps!

    hello-from-seattle-love-jar-by-Amy-Tsuruta-for--Impress

    I love how on both cards, she stamped an envelope!  The envelope is important because this is what the receiver usually sees first!  Thanks Amy for sharing all of your wonderful ideas!

  • How to Use Washi Tape with your Word Dies

    copper_washi_tape

    We have so many great metallic (foil) washi tapes in stock!  I love this copper tape with the polka dot like pattern.  The dots are more random instead of a in a pattern.  I've been using copper or rose gold on a lot of valentine projects this season.  You can even see that the twine used on this card is copper and white!  Using washi tape for die cut projects is perfect because the patterns are typically much tighter than what you will find with printed paper.  I simply lay the tape on a piece of card stock and cover an area larger than my die cut that I will be using and then die cut the shape. This LOVE die from Savvy Stamps is perfect! You can see the lines in the photo with how I lined them up but when you see the card in person, you barely notice it.  Another idea would be to do this with a few different washi tapes that go well together and die cut your shape. For this card, I then mounted the word using foam tape onto a white album style folded card.  Thanks for stopping by!

  • Make Your Own Gift Card Shaker Card

    IMG_2082

    Shaker cards are very popular and it's easy to make a quick shaker card using the Fuse Tool.  I love to give gift cards and making a sealed card is perfect for giving them!  The receiver has to cut it open to retrieve the card.  For this sample, I stamped our new arrow stamp using Fresh Ink grape creating a background pattern.  I did layer it onto kraft cardstock, not that it's necessary.  I attached the gift card using mounting tape.  They have so many cute gift cards at Starbucks this year for Valentine's Day!  I love the heart shaped one's.  For sealing in your card, you can use acetate sheets with the fuse tool.  I usually fuse 2 sides and then add my sequins into the card and seal the other two sides.  Once all sides have been sealed, I'll trim the edges with scissors.  You'll want to use the metal ruler that comes with the Fuse Tool so that each side is straight.  Thanks for stopping by!

  • Guest blogger: Amy Tsuruta - Part 3

    It's Friday and we are lucky to have Amy back again with a couple of great card ideas!  I love to see these stamps used in different ways.  Amy has a great approach to her card making style and I love how she explains the process.  Sometimes what we think we envision in the beginning turns out completely different.  She has a few great tips with this shaker card and the acetate!  You'll have to hop on over to her blog for the details!

    Jar with hearts by Amy Tsuruta for Impress

    Jar with hearts interior by Amy Tsuruta for Impress

    Also, great idea of stamping the sentiment inside the card Amy! Here is another card using one of our printed note cards!  This is more of a masculine type card and like I mentioned last week, we can never have enough ideas.  I love the idea of mixing patterns with the chevron on the card and the wood grain heart.  The colors compliment each other so well!

    good things by Amy Tsuruta for Impress

    These note cards aren't your normal shape - they are tall and skinny.  I love to send cards that are unusual in size!  They stand out in the mail.  Thanks again, Amy!  We really appreciate taking the time to share your creative designs with us.

Items 1 to 10 of 11 total

Page:
  1. 1
  2. 2
View Full Site